
Knowledge
The Causes and Improvement Measures of Surface Cracks in Forgings
The Causes and Improvement Measures of Surface Cracks in Forgings
After quenching and tempering treatment, 40Cr steel has excellent comprehensive mechanical properties, is moderately priced, and is easy to process. Currently, it is one of the most widely used steel grades in the machinery manufacturing industry. China Vigor is actively and deeply involved in the deep processing sites of its customers to understand their product process flows; by analyzing abnormal samples, it identifies the fundamental causes of surface cracks in 40Cr forgings and proposes solutions. On the one hand, it guides customers to improve their production processes and maintains a good relationship with them; on the other hand, it also understands the terminal uses of the products and promptly adjusts the production processes of 40Cr continuous casting billets (or rolled materials) to produce products that meet market demands.
1 Technical Specifications
The basic technical specifications for delivery are as follows: The main specifications of continuous casting billets include square billets of 300 mm × 300 mm, 350 mm × 450 mm, and 370 mm × 480 mm, and round billets of 300 mm, 400 mm, 450 mm, 500 mm, and 600 mm. The specifications of hot-rolled round steel are φ105 to 270 mm. Taking 40Cr hot-rolled bars as an example, the main production process is as follows: converter (electric furnace) - refining - VD - continuous casting - hot delivery - hot rolling billet - four-high rolling - slow cooling.
The basic conditions for the delivery of 40Cr continuous casting billets are as follows: The low-magnification structure shall be evaluated in accordance with YB/T 153—1999. The grades of central porosity, shrinkage cavity, central crack, subcutaneous crack, and subcutaneous bubble on the acid-etched low-magnification structure test piece of the cross-section of the casting billet shall not exceed grade 2.0. The surface of the casting billet shall be free from visible shrinkage cavity, subcutaneous bubble, butt joint, skin peeling, scab, inclusion, etc. There shall be no crack with a depth greater than 1 mm, and no scratch, indentation, pore, wrinkle, cold splash, protrusion, depression, transverse vibration mark, etc. with a depth or height greater than 2 mm. If the surface of the steel billet has any of the above-mentioned defects that are not allowed or exceed the permitted regulations, they shall be removed. The width of the removal shall not be less than 6 times the depth, and the length shall not be less than 10 times the depth. After removal, the depth of the defect shall not exceed 10 mm. The defect area after repair shall be smooth and free of sharp corners. Only after meeting the requirements can the billets be sold externally or rolled to reduce the rejection of bars due to billet defects such as breakage and large cracks.
The basic conditions for the delivery of 40Cr hot-rolled round steel are as follows: The acid etched low-magnification structure shall be evaluated in accordance with GB/T1979, with central porosity, general porosity and ingot segregation not exceeding 2.0, and general point segregation, edge point segregation and subcutaneous bubbles are not allowed. The austenite grain size of the steel shall be determined in accordance with GB/T6394, with the grade being no less than 5.0 and the difference in grain size uniformity not exceeding 3 grades. The steel shall be inspected for non-metallic inclusions in accordance with GB/T10561, and evaluated by Method A. The qualified grades of inclusions shall be as follows: A coarse/fine system ≤ 2.0/≤ 3.0; B, C, D coarse/fine system ≤ 1.5/≤ 2.5. 2
2. Cases
Crack Case of 40Cr Forged Steel I
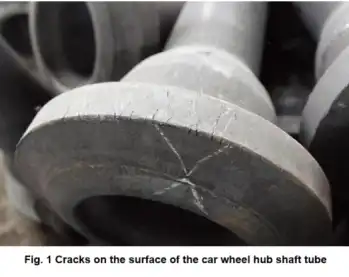
◆ Basic Situation: A certain machinery company purchased 40Cr steel with a specification of φ115 mm, which was used by the user to manufacture the axle tube of the car wheel hub, as shown in Figure 1. The user found surface cracks at the bottom of the axle tube where it was deeply deformed after forging (die forging) (before the heat treatment process was carried out), resulting in about 30% of the workpieces being scrapped.
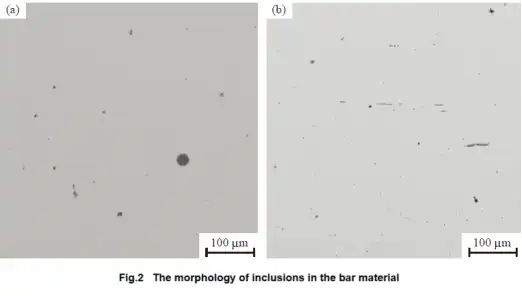
The morphology of inclusions in hot-rolled bars is shown in Figure 2.
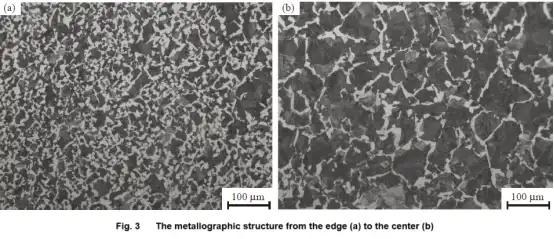
The microstructure from the edge to the center is shown in Figure 3. The network is ferrite and the interior is lamellar pearlite. The size of the ferrite network varies from the edge to the center, and the average grain size shows a gradually increasing trend from the edge to the center.
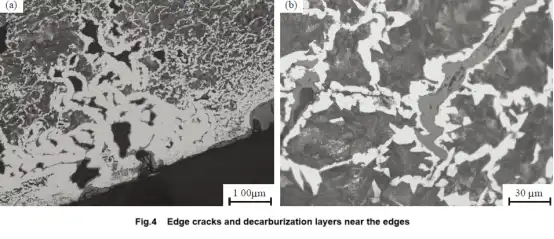
There are obvious cracks on the edge, and near the cracks, there is a decarburization layer formed due to oxidation. Among them, the white part on the edge is ferrite, the black part is holes, and the gray part is oxidation products, as shown in Figure 4.
Case of Cracks in 40Cr Forged Steel II
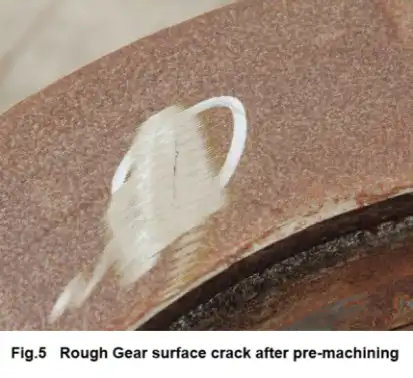
◆ Basic Situation: A forging company in Jiangsu purchased 40Cr continuous casting billets with dimensions of 300mm × 300mm. The composition, low-magnification structure defects and grades all met the internal control requirements of the enterprise. The user forged the continuous casting billets into gears. The basic processing procedures for the user's gears were: blanking - heating - forging into round bars - sawing - quenching and tempering - rough and finish turning. A total of 21 gears were processed by the company, among which 11 gears were found to have cracks after rough turning, and the cracks were basically at the same location, as shown in Figure 5.
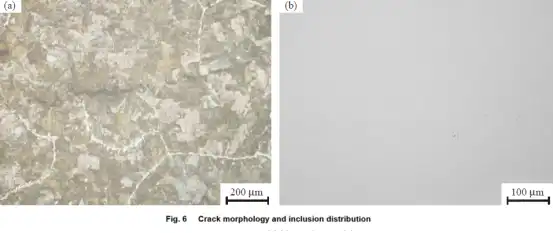
Metallographic analysis near the crack: The crack morphology and inclusion distribution are shown in Figure 6. There is no obvious decarburization on both sides of the crack. The microstructure consists of lamellar pearlite and reticular ferrite. Additionally, the inclusion grade was determined. Among them, the coarse/fine grades of A, B, and D types are 0.5/0, the coarse/fine grade of C type is 1.0/0, and the DS inclusion is 1.5, which does not exceed the internal standards of the enterprise.
3. Analysis and Discussion
In Case I, based on the test results, the cracks mainly occurred on the surface and subsurface layers. The white ferrite near the cracks was formed due to decarburization, and the oxidation products were gray. It is urgent to find out the cause of decarburization on the surface and especially in the subsurface layers. The possibility that the large residual processing stress of the steel caused cracks during heating is relatively small. The φ115 mm bar can easily release residual stress during heating. Additionally, the possibility that the cracks were caused by inappropriate heating temperature during forging is also relatively small. The fast cooling speed after forging cannot form such cracks either, as it is difficult to form a large decarburization layer near the crack source at a fast cooling speed (the final forging temperature is generally 850℃, and a long-time holding at 650℃~850℃ is required to form a decarburization layer). Dong Changxing et al. believe that if decarburization is found near the cracks, it indicates that the original material has defects, and the microstructure near the cracks changes during heating, which is prone to form white ferrite. Based on the above analysis results, it was finally confirmed that the surface cracks of the forging billet were caused by subsurface gas holes (cracks) in the bar, and this was ultimately confirmed through an acid washing test. The manufacturer used high-frequency electric heating, and decarburization occurred near the defects during the rapid heating process of the bar. During the forging process, due to the presence of oxides, the diffusion of atoms was hindered, making it difficult for the cracks to weld together and they would further expand under tensile stress, eventually resulting in some defective products.
In Case II, no decarburization was found near the cracks, indicating that the cracks did not exist during heating, meaning that there were no cracks in the original material. To fundamentally solve this problem, a detailed investigation was conducted on the basic processes of processing the continuous casting billet into gears. During the investigation, it was found that the machining allowance design during the process of turning the billet into bars was incorrect. The standard should be based on GB/T 21471—2008. For example, if the net size of the gear ring is φ200 mm and the thickness is 50 mm, and 20 pieces are processed at a time, according to this standard, the forging billet before machining should be φ(215±6) mm and the length should be (1130±12) mm (Note: the sawtooth width is about 5 mm) to meet the cutting requirements. However, the customer controlled the machining allowance at about 8 mm when making the forging billet, and folding is also likely to occur when a 300 mm×300 mm square billet is forged into a round bar. Therefore, the designed machining allowance cannot meet the actual production requirements. Additionally, it was found during the investigation that there were also problems in the production process organization of the customer. Rough turning should be done before quenching and tempering, rather than completing rough and finish turning after quenching and tempering. If quenching and tempering is done before rough turning, even though the forging is small, it is still prone to quenching cracks due to surface defects of the forging billet during quenching. The above opinions were recognized by the user, and no quality disputes occurred after the above adjustments.
Conclusion
1) Subsurface gas holes (cracks) in the bar stock are the main cause of cracks in the wheel hub shaft tubes of automobiles. By choosing a protective slag with lower viscosity and baking it in time, maintaining uniform cooling of the clamping rolls and repairing them in a timely manner, the formation of subsurface defects can be prevented. Bars with subsurface gas holes (cracks) are recommended to be used for cutting processing instead of pressure processing.
2) Improper design of the forging drawing is the fundamental cause of cracks on the surface of 40Cr gears. Timely communication with downstream customers can avoid unnecessary quality disputes.


