Knowledge
Analysis of the Causes for the Unqualified Impact Performance of 30CrNiMo Cast Steel Parts
Abstract: In response to the issue of substandard impact energy absorption in 30CrNiMo cast steel parts after quenching and tempering, the reasons for the substandard impact energy absorption were analyzed through methods such as fracture analysis, metallographic examination, hardness testing, and chemical composition analysis. The results indicated that the fracture surface of the 30CrNiMo cast steel parts was intergranular. Metallographic examination revealed that the grains in the quenched state were uneven, with the presence of mixed grains. Nb accumulated at the original austenite grain boundaries to form NbC, which not only reduced the activity of the grain boundaries and hindered grain boundary migration but also formed numerous second-phase particles that pinned the grain boundaries and consolidated the grain boundary inheritance. Ultimately, this led to the coarsening of austenite grains, an increase in the ductile-brittle transition temperature of the steel, and the formation of brittle transgranular fractures and low impact performance when the steel was impacted at room temperature.
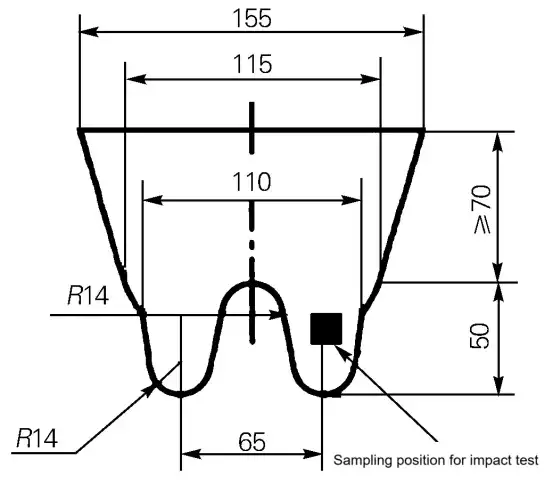
Keywords: 30CrNiMo steel; impact energy absorption; intergranular fracture; NbC; grain boundary segregation 30CrNiMo steel is widely used in mining machinery due to its high hardenability, excellent comprehensive mechanical properties, and good cold and hot working properties. The production process of 30CrNiMo cast steel parts includes casting, normalizing (890℃×1h, air cooling), quenching and tempering (880℃ for 1h, water quenching, 600℃ tempering for 2h). During performance testing, the impact energy absorption was substandard (all test values were less than 10J, far below the lower limit of the required value of 34J). The impact samples were taken from single-cast test blocks, and the sampling locations are shown in Figure 1. This paper determined the reasons for the substandard impact energy absorption of the cast steel parts through laboratory testing and analysis using scanning electron microscopy and optical microscopy.

Fig.1 Sampling location of the impact specimens
1 Physical and chemical inspection
1.1 Microscopic morphology of the fracture surface
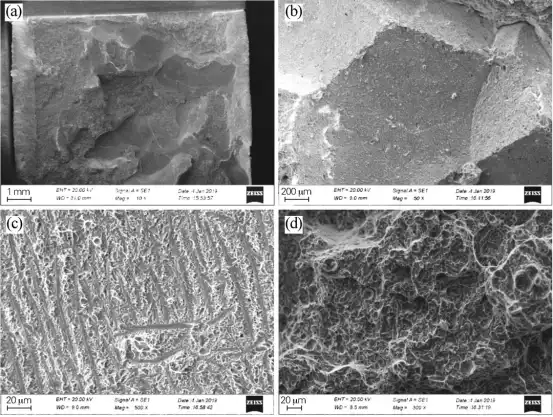
The fracture surface of the impact samples was observed using a ZEISS EVO15 scanning electron microscope. The fracture surface morphology is shown in Figure 2. As can be seen from Figure 2, the macroscopic fracture surface morphology was abnormal, with many small planes on the fracture surface, which was a clear intergranular fracture. Under the scanning electron microscope, many stripes were distributed on the small planes of the fracture surface. When further magnified, the stripes showed cleavage and quasi-cleavage features; the edges on both sides were dimple morphologies.

Fig.2 SEM fracture morphologies of the normalized tested steel (a) macroscopic; (b) intergranular fracture; (c) as-cast crystalline microstructure; (d) dimple morphology (d) dimple morphology
1.2 Energy spectrum surface scanning and composition analysis
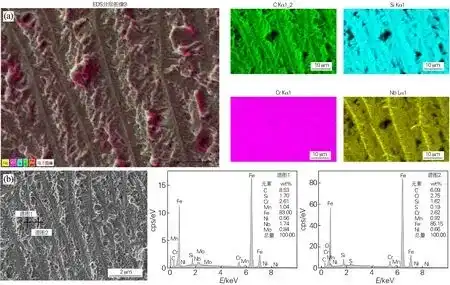
The X-Max50 energy spectrum analyzer was used to conduct micro-area composition analysis on the stripe area of the small plane of the fracture surface. The results are shown in Figure 3. As can be seen from Figure 3, the surface scanning results of the fracture surface show that the distribution of Nb is uneven and there is a segregation phenomenon. The quantitative analysis results show that the Nb content at the stripe area is 1.74%, and the Nb content between the stripes is too low to be detected. The Nb content at the stripe area is higher than that in the non-stripe area around it.

Fig. 3 EDS analysis at small plane fracture of the quenched and tempered tested steel (a) surface scanning results at fringe; (b) quantitative analysis results at the fringe and between the fringes. (b) Quantitative analysis results at the fringe and between the stripes
1.3 Microstructure
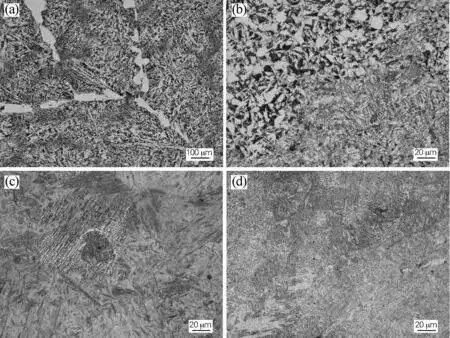
Samples were taken from the same batch of as-cast, normalized, quenched and tempered specimens at the same location. They were etched with a 4% nitric acid alcohol solution and then examined under a ZEISS Imager.M2m optical microscope. The results are shown in Figure 4. The as-cast microstructure consists of intergranular strips and blocks of ferrite, with acicular ferrite and pearlite within the grains. The normalized microstructure is ferrite + pearlite + granular bainite. The quenched microstructure is martensite + granular bainite. The tempered microstructure is tempered sorbite.

Fig. 4 Microstructure of the tested steel under different heat treatment states (a) as-cast; (b) normalized; (c) quenched; (d) tempered (b) normalized; (c) quenched; (d) tempered
Grain size inspection was conducted on the as-cast and quenched microstructures, and the results are shown in Figure 5. The grain size of the as-cast microstructure is inferior to the 00 grade specified in GB/T 6394-2017 "Method for Determination of Average Grain Size of Metals", and the grain size is relatively close to the size of the small planes on the fracture surface. The grain size of the quenched microstructure is extremely uneven, showing a dual grain size characteristic.
1.4 Chemical composition inspection
Samples were taken from the impact test specimens and chemical composition inspection was carried out using a 5110VDV plasma emission spectrometer and a DK 606 infrared carbon-sulfur analyzer. The results are shown in Table 1. It can be seen from Table 1 that the chemical composition of the impact test specimens complies with the requirements of ZG30CrNiMo steel in JB/T 5000.6-2007 "General Technical Conditions for Heavy Machinery - Part 6: Cast Steel Parts".
1.5 Hardness inspection
The FM-310 microhardness tester was used to test the hardness of the cleavage morphology area and the dimple morphology area on the fracture surface of the impact test specimens. The test force was 0.98N, and the test force holding time was 10s. Five test points were selected in each area. The average hardness of the cleavage morphology area was 334HV0.1, and the average hardness of the dimple morphology area was 328HV0.1. No significant difference in hardness was observed between the two areas.
2 Analysis and discussion
The chemical element results show that the chemical composition of the cast steel part complies with the requirements of ZG30CrNiMo steel in JB/T 5000.6-2007. The hardness test results rule out the possibility of uneven material hardness causing the failure of impact energy absorption. The microscopic morphology of the fracture surface shows that the impact test specimen has intergranular fracture. The size of the small planes on the intergranular fracture surface is relatively close to the original austenite grain size of the as-cast state, indicating that there is a grain boundary inheritance phenomenon during the heat treatment of the cast steel part. Generally speaking, the driving force for grain boundary migration is inversely proportional to the curvature radius of the grain boundary. The larger the original grain, the straighter the grain boundary, and the curvature radius is nearly infinite, the less likely it is to migrate during subsequent heating, and the more likely it is to retain the original grain boundary intact. The energy spectrum inspection results show that the Nb content at the stripes is higher than that in the surrounding non-stripe areas, indicating that there is Nb segregation in the steel. Nb is a strong carbide-forming element and exists mostly in the form of NbC carbides in steel. When there are precipitates at the grain boundaries in steel, they are difficult to be completely dissolved at the general heat treatment temperature and thus cannot be eliminated [1]. The metallographic inspection results show that ferrite + pearlite and granular bainite microstructures were formed during normalizing treatment. For 30CrNiMo steel, according to relevant research [2], due to the presence of high Cr, Ni, Mo and other alloy elements, non-equilibrium transformation may occur even at a relatively slow cooling rate. Once bainite or martensite is formed, according to the microstructure inheritance phenomenon of steel [3], subsequent normalizing or quenching and tempering may not be able to eliminate this microstructure, resulting in mixed grains or coarse grains in the heat-treated specimens. Since Nb has the effect of increasing hardenability and inhibiting the formation of pearlite, it indicates that the alloy element segregation in the steel was not eliminated by normalizing, and the uneven grains in the subsequent quenched state and the occurrence of mixed grains also indicate the existence of alloy element segregation. The segregation of alloy elements at the grain boundaries can change the migration characteristics of the grain boundaries. On the one hand, the alloy elements segregated at the grain boundaries can reduce the activity of the grain boundaries and hinder their migration. On the other hand, they may form more second-phase particles to pin the grain boundaries and consolidate the grain boundary inheritance [4].
3 Conclusions and suggestions
1) Through the detection and analysis of the impact fracture surface of 30CrNiMo cast steel parts, it is found that the non-equilibrium transformation microstructure and grain boundary inheritance caused by alloy element segregation are the direct reasons for the failure of impact energy absorption of the specimens. 2) In response to the occurrence of non-equilibrium transformation structures such as bainite in the specimens after normalizing, the normalizing process was adjusted to isothermal annealing to prevent non-equilibrium transformation, which can reduce the degree of grain boundary inheritance and effectively improve the impact performance of the specimens.


